

Hardwood Floor Refinishing is a great way to restore your wood floors’ appearance and extend their life. It can also add value to your home, which is important if you’re planning on selling in the future.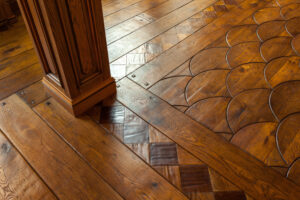
To prepare for refinishing, you’ll want to remove all furniture and rugs from the room. Then, you’ll need to sand down the boards in the room and apply a new finish.
The process of sanding hardwood flooring is a good way to remove the old finish and prepare the wood for staining. It also makes the wood look smooth and even.
Before you begin sanding, you should make sure that you have enough sandpaper to do the job. You may find that you need more than one grit of paper. If this is the case, you can purchase sandpaper in different grits and switch it out when necessary to get the job done quicker.
You should always use a dust mask when sanding hardwood floors. This is because the sanding process produces a lot of dust and fumes, which can cause respiratory problems. It is also recommended that you cover vents and doors with plastic to keep the dust from spreading throughout your home.
Sanding is a process that can be done by hand or with machine tools. The type of sanding equipment that you need to sand your floor depends on the age of the hardwood and the type of finish. It is also determined by the amount of damage that the flooring has suffered from water or humidity.
To start sanding, you must clean the floor well and remove any debris that may be in it. This includes furniture, carpeting, and other items that might get in the way of the sander. You should also vacuum the floor thoroughly before sanding it.
Once the floor is sanded, you can stain it to your liking. Various stains are available, including dark walnut, red oak, and royal mahogany. The darker the stain, the more natural it will look.
The final step in sanding your hardwood floor is “screening.” This is a technique that blends the edge-sanded perimeter with the drum-sanded field. It is done with a rented buffing machine or sanding pole, similar to the kind that is used for sanding drywall.
This technique is a good idea because it eliminates any remaining sanding scratches that the sanding equipment might leave behind. This is an especially important step if you want to change the color of your floor.
Staining is a process that can be used to add color and depth to hardwood floors, and it can also pull together the design of a room. However, it can have a number of disadvantages as well.
When deciding on whether to stain or not, it’s important to consider your own personal style as well as the overall design of your home. For example, if you like rustic farmhouse-style interiors, a rich red shade would be out of place, but a mid-toned brown hue would work much better.
Choosing the right stain color is a big decision, and you should take your time to get it right. This is like choosing the color of a new car–it’s not an easy choice to make, and it requires a lot of thought.
You should ask your flooring professional for a color sample to help you decide what will best suit your home. They will be able to recommend a wide variety of colors that will complement your furniture and decor.
Another consideration is the type of wood that you’re working with. Some woods, such as maple and birch, are very difficult to stain evenly because they have very small pores. This can lead to blotching and mottling.
In addition, coniferous woods, such as pine and fir, contain sap that actively resists stains. If you’re unsure about what kind of wood you have, it’s a good idea to have a flooring professional examine your floor before you begin the staining process.
The key to staining a beautiful floor is choosing the right product and using it correctly. It’s important to apply the stain with a rag and avoid pad applicators or paint brushes. It’s also important to follow the manufacturer’s directions carefully and allow it to dry completely before moving on to the next step.
The first step in staining a floor is to remove all of the dust from the area with a vacuum. Vacuuming is an excellent way to clean the area before applying any staining products, and it can also help to prevent excess stains from running down the sides of the floors. You should also be sure to wash the floors after sanding, as this will help the stain to penetrate into the wood’s pores.
If you have hardwood floors in your home, you know that a good finish is essential to keeping them looking great. This protective layer helps to guard your wood against scratches, water damage, and dirt. And it also protects your floors from the wear and tear that they get over time.
Whether you have new or old hardwood floors, the right finish can make all the difference in how they look and how long they last. Learn how to choose the best type of finish for your floors and how to apply it properly so that you can make sure they’re protected and look their best.
Oil-based polyurethane is one of the most common types of finishes used on hardwood flooring. These durable, stain-resistant finishes are easy to work with and can help keep your floors looking their best.
But they don’t offer all the benefits of other types of finishes. They also take longer to cure and are more likely to leave behind scratches. Fortunately, these minor defects can often be repaired by re-coating the area with penetrating oil.
Penetrating oils are more flexible than surface finishes and move with the wood as it expands and contracts. They can also be topped with a finish that adds staining capabilities, which can give your floors a more custom look.
For a smooth, even finish, you’ll want to follow the recommended application procedure for the particular product you’re using. For example, an oil-based polyurethane may require a china-bristle brush for edges and corners, while a water-based polyurethane needs a synthetic applicator for an open floor.
The process is a bit more complicated when you’re working with multiple coats. For each coat, make sure you’re applying it to the entire floor and avoiding drips. For an especially smooth finish, sand lightly between each coat with 220-grit paper or #000 steel wool before adding another coating.
Once each coat dries, you’ll need to remove the furniture and any other items on the floor. These items should be moved into a different room until the finish has had plenty of time to fully cure.
There are several ways to keep your wood floors looking great, including using a good hardwood floor cleaner. If you’re unsure about what type of cleaning product is best for your floor, consult with the manufacturer. They will usually recommend a cleaner that’s formulated specifically for their product.
Sweep and vacuum regularly, especially on surface finishes, to remove light dirt, dust, and pet hair that accumulates on the floor. For more nooks and crannies, dry-mop or use a microfiber mop with a head affixed to a soft, synthetic cloth pad.
Hardwood flooring can become damaged from spills or stains, so be sure to wipe them up right away. Doing so will protect the finish and prevent refinishing costs.
Keeping hardwood floors well-protected also helps to reduce the amount of dirt that collects on the floor. Place rugs and runners in high-traffic areas like entryways to lessen tracked-in dust, dirt, and debris. In addition, keep a small towel or cleaning cloth tucked away at each door to quickly wipe up any errant puddles of water.
If you’re moving furniture around, use a felt floor protector on the bottom of any piece. It will reduce the chance of scratching the hardwood floor and make it easier to move heavy objects.
Regularly sweeping and mopping the floors with a cleaner formulated for hardwoods, such as Method’s Squirt & Mop Wood Floor Cleaner ($5), will help to reduce dust and dirt buildup. However, avoid steam cleaning as it can damage or dull a floor’s polyurethane finish.
A simple solution of diluted vinegar (1/2 cup to 1 gallon of warm water) is also effective, though it’s better not to use a “cleaning” vinegar because that can leave behind a vinegar smell. For a safe and environmentally-friendly option, add a few drops of essential oil to the cleaning solution.
Taking the time to dust, deep clean, and apply a fresh coat of floor wax will help to keep your floors looking their best. It will also protect the finish, which will hold up to frequent refinishing.